Showing posts with label Cricut. Show all posts

Wednesday, September 30, 2015

Framed Prayers & Printing Tutorial

A couple years ago my bible study completed our Marian consecration using the 33 Day's to Morning Glory by Michael Gaitley. That next Christmas I framed one the Mother Teresa quotes that the book shared and gave it to my very dear cousin who is in my study group. She loved it so much that this past month she requested I make a handful of framed prayers and quotes for her to give as gifts. 
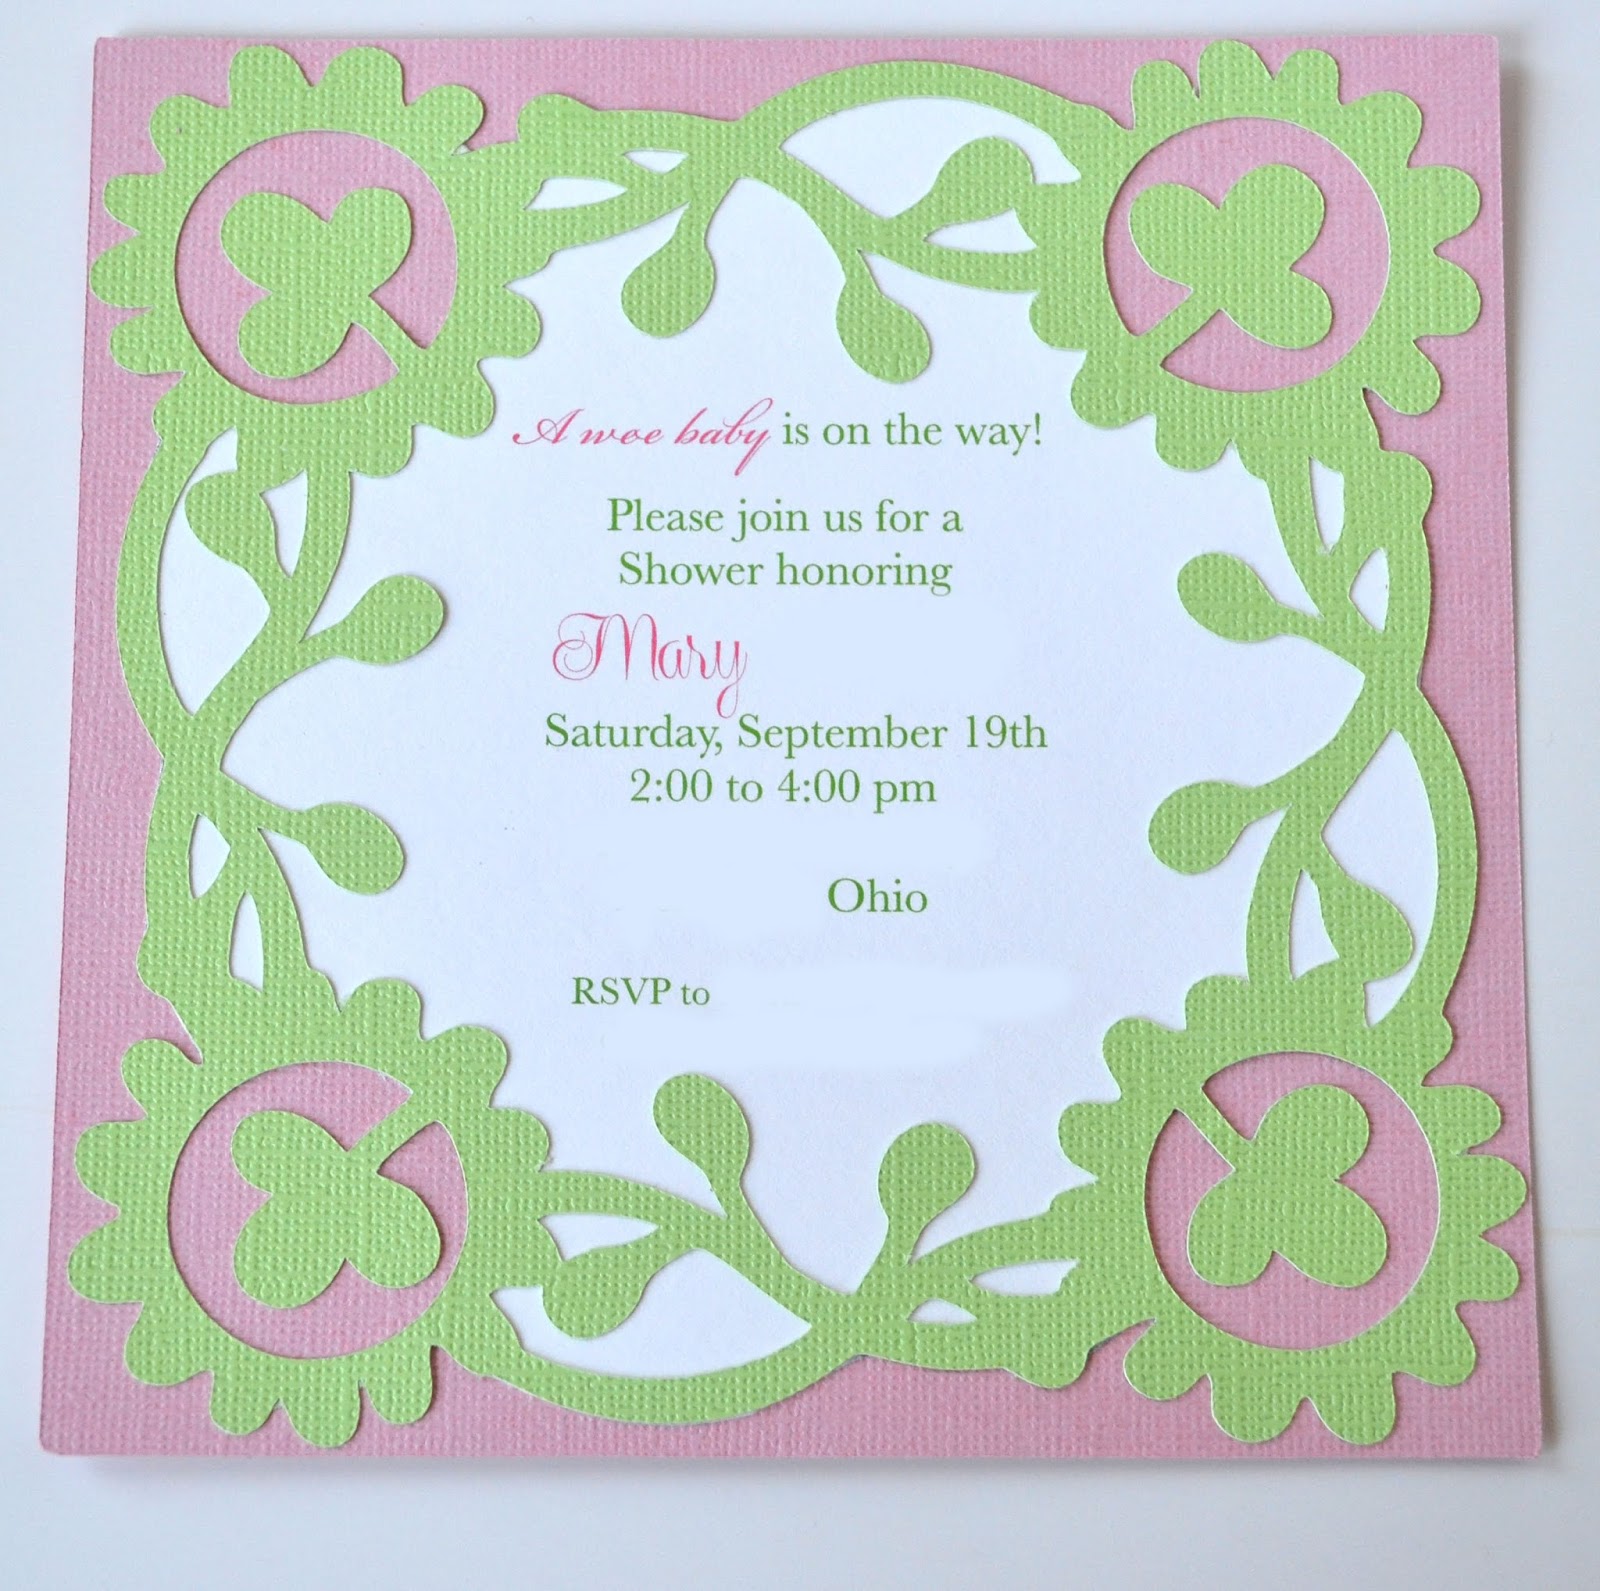
The style above and below is the same as I had given to her that two Christmas' ago. I knew exactly how I wanted to look before I started but had the worse time finding an intricate cut frame in my zillion Cricut images. It drive me nuts that most of the frames are not standard picture sizes and when you change the size in the craftroom it loses what you liked about it in the first place. So I came up with this frame I used multiple cuts from the Ornamental Irons II cartridge and welded them together in the Craftroom, It was rather labor intensive since the Craftroom doesn't like when you over design things. I hope this is something I hope they remedied in the new Design Space software for the Cricut Explore. I have included the Craftroom file below if you are interested in using it. You will need to own the Oriental Irons II cartridge to complete the cuts.
These are 8"x10" frames and the center rectangles are 5"x7". With some finessing the scroll frame size can be changed in the Craftroom but as it is now it is set to overlap the 5"x7" cut/picture. 
I used the Snell Roundhand font for Mother Teresa's prayer. This font can be found free on the internet if you don't already have them on your computer.
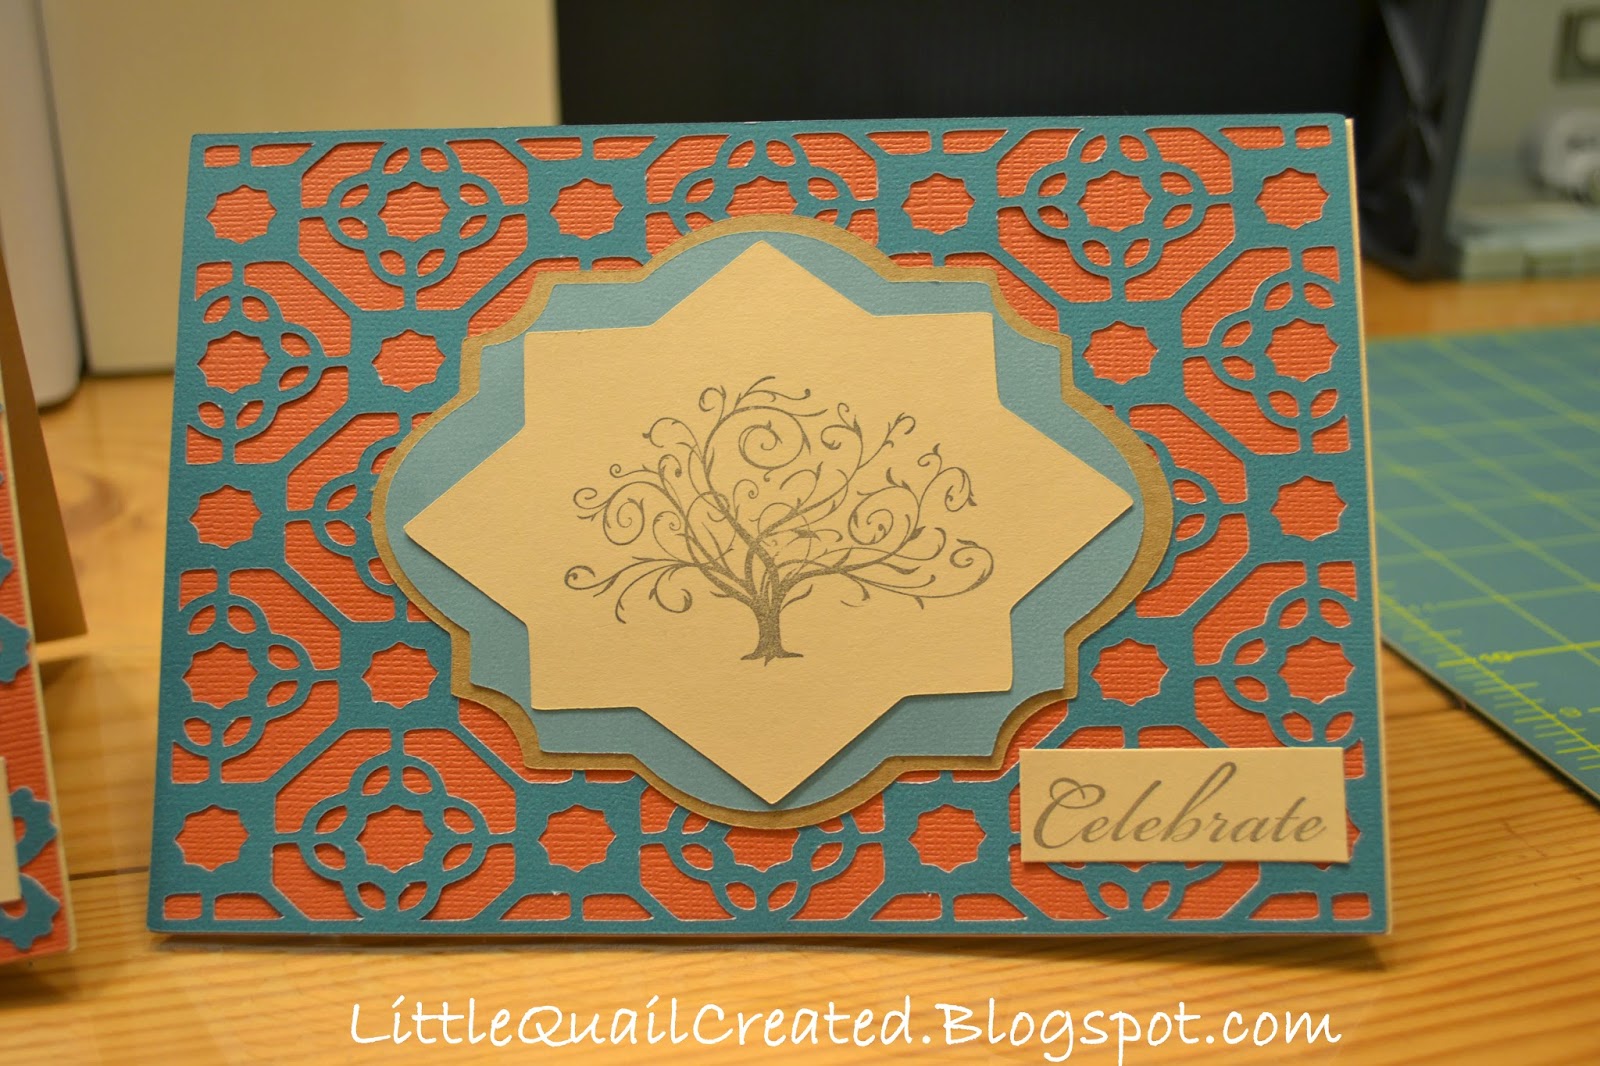
Another one of the prayers she asked for was the Humility Prayer. This one was rather challenging since it is long and you really can't alter the format. The frame I found is from the Cake Basics cartridge. I'm not sure how someone would used this design on a cake??? Maybe on a sheet cake? Any way's, I digress, It works perfect for this. I find that I use this cartridge and the Holiday Cakes a lot. If you have avoided these thinking that they aren't usable for paper crafting, don't! These have the best fonts and are great for card making.
This is a 5"x7" frame. If you have any interest in making your own, the cut file is below but you will need the Cake Basics cartridge to use it.
Cricut Craftroom File (CCR)
Another challenge for this one was finding a font that is easy to read but still attractive. I end up settling on Baskerville & 5th Grade Cursive. Again, these fonts can be found free on the internet if you don't already have them on your computer.

The Humility prayer was another one of these that is printed out after the base was cut. As I mentioned I would last week, I put together a tutorial on how I do that. It's really quite easy.
I use 8.5"x11" grid paper and double sided removable tape. 
1. Cut the images. The base that will be printed on and the frame that will be layered on top of it,
2. Print the verse on the grid paper. Line up the frame around the printed verse so it appears in the center or how you would like it to look. 
3. Put pencil dots at key points around the frame like shown above.
4. Remove frame and stick two strips of removable double sided tape at the top and the bottom of the printing area.
 5. Remove the backing of the tape. Using the pencil marks and the grid lines to make sure it is level, adhere the cut that you would like to printed on.  
 6. Make sure the paper is put in the printer going the correct direction. Mine is face up head first. Then print.
 It should peel off easily and be lined up perfectly! Now glue it together and finish up your project : )
Thanks for stopping by the nest & God Bless!

Darla

Wednesday, September 23, 2015

Apple Picking Birthday Invitation

My little girl turns 4 today! It pretty exciting for us. Lots of new things like school and car booster seats. She's going to be pretty excited today when I pick her up from school and she won't have a car seat anymore. It's the little things that make us happy around here : )

So for the second year now Hannah is having an apple picking party for her birthday. Last year I choose apple picking cause what the hey, kill two birds with one stone, she wanted a party and I needed to apple pick. This year she asked for it. I'm happy she did. It's so much fun to do with friends and family and most u-pick orchards our happy to let you picnic.

This year I put together this apple picking invitation which was a bit labor intensive but well worth it I think. I used the Cricut again. The apple tree is from the Create a Critter 2 cartridge and the frame is from the When I Was a Kid cartridge. All of the paper is from a 12"x12" multipack from Target. The card base is 6"x 6". I used two fonts, Cinnamon cake for the title & Apple cider daydreams for all the sub text, Appropriately named don't you think! These fonts can be found free on the internet if you don't already have them on your computer.

Below is a link to the Cricut Craftroom File if you are interested in making your own. You will have to own the Cricut cartridges to enable you to cut though.
Cricut Craftroom File (CCR)

Thanks for stopping by the nest!
Darla

Tuesday, September 22, 2015

Baptism Invitation

Another one of my paper projects this past month was for baptism invitations. My friend was having a hard time locating an invitation that she liked and asked me to put some together for her. Her little darling is such a cutie, anytime I think of color combinations for her I think of delicate pinks. 

I love how the two tone pinks came out and the scroll work frame gives it a nice sophistication. Having to blot out a good portion of the text for privacy I lost how attractive it really is but I think you can get the picture.


The cuts are from the Sentimentals cartridge and the base measures 5.75"x8". The paper is a basic white card stock, Pick Tutu & Pinkini by Bazzill. The fonts I used are Bickham Script for the title & Baskerville for the rest. These fonts can be found free on the internet if you don't already have them on your computer.


Below is a link to the Cricut Craftroom File if you are interested in making your own. You will have to own the Sentimentals cartridge to enable you to cut though.
Cricut Craftroom file (CCR)

Thanks for stopping by the nest!

Darla

Monday, September 21, 2015

Baby Shower Invitation


This past weekend I hosted a baby shower for good friend of mine. They are have a little girl next month and planning to name her Bridgid after St. Brigid of Kildare so of course it had to be an Irish themed party. I searched and search for a shamrock/clover design that wasn't to cartoony and very feminine. Wow that was a challenge but in the end I think I got what I was looking for.

I keep the invitation really simple and used my trusty Cricut. The cuts are from the Storybook cartridge and the base measures 6"x6". The paper is Baby Pink by core'dinations, Apple Green by core'dinations & Basic White. The fonts I used Bickham Script for the title (a wee baby), Centeria Script for the guest of honors name & Baskerville for the rest. These fonts can be found free on the internet if you don't already have them on your computer.

Below is a link to the Cricut Craftroom File if you are interested in making your own. You will have to own the storybook cartridge to enable you to cut though
Cricut Craftroom File (CCR)

I figured out a pretty nifty way to print the text on already cut pieces. I'm going to try to put together a tutorial to share this week,

Thanks for stopping by the nest!
Darla

Tuesday, April 14, 2015

Sailboat Invitation

My baby Noah is turning one next month. It just doesn't seem possible. He has turned into quit the little man and his little personality is exploding. He even does stuff just to make us laugh. To celebrate this little life I am putting together a sailboat themed birthday party for him. This has given me another excuse to pull out the scrapbook supplies.

For invitations I always use a 8" x 6" no fold card. Over the years I have accumulated a ton of envelopes leftover from photo cards that fits this size perfectly.

I used basic solid card stock for all layers. The base is a natural paper grain, navy blue for the layer base, deep red for the boat, pale blue for the water, white for the sail and portholes and bright yellow for the boat strip.

For the invitation text I printed on standard white printer paper and over laid it on the white sail. This worked out but aesthetically I could have done better. I should have just printed on 8.5" x 11" white card stock and then cut out the sail. Oh well, live and learn. 

All but the water was cut using the free Cricut Font and Basic Shapes. The water is on the When I Was a Kid cartridge (on the frame tab, called comb).

I am sharing my craft room file which can be found below. The craft room cut file is setup for 10 invitations. The base that was cut on the natural paper grain was cut by hand and is 8"x6". Same with the invitation text, that was cut to fit the sail. Everything else is on the Cricut. I have no idea if this file works in the Cricut explorer design studio. If it does could someone leave me a comment to let me know. I tried looking it up but didn't find anything.

Cricut Craft room File Link
The base cuts two at a time so that will need to cut 5 times to get the 10 count.
The sail cuts 6 at a time so that needs to be cut twice and you will have a couple left over.

I take the term "scrap"book pretty seriously. I have a hard time parting with paper and fabric that is leftover from a project especially when I know I can do something else pretty cool with them. I am always trying to maximize what I have. I have even gotten pretty good at it. For this project I challenged myself to come up with creative ways to eliminate as much waste as possible. The way I designed the craft room cuts the left overs will look like what I have pictured below.
DON'T THROW THESE AWAY! and do your best to be careful when you remove them from your mat. I have plans for these scraps and will show you have I have used them in a future post. As you can see with the natural paper I already assembled the 1/2" wide remnants a lattice piece that I thought might be cute on an apple picking scrapbook page.

A lot of times I find that I like the negative more than what I was actually cutting out. Its fun to challenge myself to use them. I hope I can inspire you to do the same.

Thanks for stopping by the nest!
Darla

Friday, February 6, 2015

Birthday Cards

I know this post is a bit unusual for me. I have never posted anything about the paper crafting that I do. So far most of my posts are about sewing and recipes. Well this is another craft I like to do when I am not being a wife, a mommy or a seamstress. I usually only get to do this when I "need" to since I am rather busy and in this case I "needed" two birthday cards. 
What inspired these cards was an outfit Lady Grantham was wearing during this seasons Downton Abby (am an addict!). It was during her trip to London. She wore a striking combination of deep blue green with a coppery orange. When you put those colors together they typically put me in mind of Morocco or India and places in between. I just couldn't stop thinking about it. When that happens I know I won't get it out of my head until released creatively. This did the trick. Sadly none of the pictures did the colors justice. (I really need to come up with a better lighting strategy for pictures.)
I used my Cricut and did all of the design work in the craftroom software.  I love the fact that you can sit in a comfy spot with your laptop and come up with a complete design all at once. The you just pick your papers, turn on your Cricut and just start cutting. I feel confident that the size of my cuts are just the right size too. No more guessing the size and holding your breath. I've wasted too many papers that I liked doing that.  All that's left is gluing it together and embellishing. 

I used the craftroom basic shapes for the card base and the rectangles I stamped, The Edge to Edge cartridge for the lattice work and the Elegant Edges cartridge (my favorite cart so far) for the base of my stamped pieces. The tree stamp is Flourish Fall Tree by Inkadinkado and the "Celebrate" is a clear stamp that came out of a bargain bin too long ago to remember. All of the paper came out of the core'dinations Super Assortment Nostalgia Stack.

Thank for stopping by the nest!

Darla