Sunday, August 18, 2013

Tiered Twirly Dress Tutorial

It was my sweet little cousin's birthday this past week and I was feeling really inspired to make her a dress. She is a girly, girl and loves purple. When I had made the skirt here, I was a little disappointed that it didn't twirl and I really wanted to give her something that made her want to spin. Every little girl should have a twirly dress, don't you think? 


When I had the opportunity to pull this dress together I was really pressed for time, so I took a short cut using a t-shirt for the bodice. It was the first time I had done this and I was surprised how well it worked. Since the dress came together so quickly I was able to make her a matching headband and a clippy flower that she can wear on the dress, on the headband or just in her hair.

I made this dress to have the serged fabric edges exposed. I liked the ruffly look at the seams. The dress can certainly be made where there is a seam allowance is on the inside of the dress using only a sewing machine. It would still use the 1/2" seam allowance. 

Tutorial 

Materials
1 1/2 yards of 45" (or greater) wide woven cotton fabric (I used a quilters cotton)
coordinating t-shirt, size 5T 
coordinating thread
ball point pins 
ball point (jersey) needle
serger
basic sewing notions

Sewing Notes
As with all apparel sewing pre-wash the fabric and the t-shirt. 

The measurements provided are for a 5T. The seam allowances are 1/2" unless otherwise indicated. The skirt hem is 1 1/4".

Cut

top tier - cut 2 pieces 23" wide by 6.75" tall 
middle tier - cut 2 pieces 33.5" wide x 6.75" tall
bottom tier - cut 2 pieces 44" wide x 7.5" tall

Instructions

- Serge the long edges of all the cut pieces. 

- With the 2 top tier pieces fabric fronts facing pin and and serge the short sides together. Repeat for the middle and bottom tier. Press to one side the serged seam on all the tiers. 

- Press the hem on the bottom tier. Fold and press 1/4" and then fold and press 1". Or since the edge is serged you can just fold over the 1 1/4" and press. Pin and sew hem. 

- With the longest stitch length on the sewing machine sew two gathering stitches across the top of each tier. One at 1/4" and the other at 3/4. Be sure to leave a long thread tail. This is now the top of each of the tiers.

- Lay out the t-shirt right side out as flat and even as possible. Measure 3" from the armhole. Mark with a line running across side to side. This will be the line that your first tier will be attached to. Trim off excess shirt fabric. I left about 1" below the line. (Note: I ended up changing this to 2" from the armhole for a more empire waist)

- Line up the top of the top tier side seam to the t-shirt side seams. The skirt tier should be on top. The top tier 1/2 seam allowance needs to line up the line marked on the t-shirt. With the ball tip pins, pin sides in place. Gently pull the gathering threads on the front of the skirt to gather the fabric to match the width of the shirt. You will need to fuss a bit to have the gathers evenly distributed. With ball tip pins, pin in place. Repeat on the back.

- Make sure your sewing machine stitch length has been shortened back to normal and has ball point needle. Sew the top tier to the shirt. Between the two gathering stitches is 1/2". Do your best to stay between the gathering stitches. This will make it easier to remove them later.
- Repeat the process attaching the middle tier to the top tier. The middle tier should be on top of the top tier. They need to over lap 3/4" (the edge of the top tier fabric with the 3/4" gathering stitch of the middle tier) Note: I find it helpful on on the middle and bottom tier's to locate middle like I show with the pins above. Then pull the gathering stitches in quarter's instead of just front and back since there is so much fabric to deal with. Gather, pin in place and sew. (Ball point needle & pins are not necessary anymore)

- Repeat again attaching the bottom tier to the middle tier. 

- Remove all six of the gathering stitches from the dresses. All done! 

Embellish with bows or flowers if you wish.


This flower was easy to put together and it is attached with a hair clip. This way she can wear it however she would like.

Isn't she darling!

First Spin  
Look at that smile! That's why it had to be twirly.


I am so happy this worked out. Seeing her smile is worth a million bucks! I knowing she is going to get lots of spinning miles on this dress. 

I see a lot more of these dresses in my future. So easy and so many fabric's to mix and match. I can't wait!

Thanks for stopping by the nest!
Darla

Friday, August 16, 2013

Pepperoni Pizza Soup Recipe

OK, so my plan to do a week of zucchini recipe posts is a bit of a fail. The zucchini sitting in my refrigerator is a visual reminder of that (not to mention the ones I have had to trash). I may have bitten off more than I can chew trying to do week long posts while being a leader for my kids vacation bible school, making a dress for a sweet birthday girl (I'll post on that when I can get the tutorial together) and my family taking a mini vacation. I have still not completely thrown in the towel on the zucchini recipe thing. We have quite the collection of zucchini and more ripening on the plant.

The temperatures around here have been dropping which has put me in the mood for soups and stews. Fall is my favorite time of year for all things. The weather, the colors, hayrides, apple picking, pumpkin patches, Halloween, Thanksgiving, I love it all! It was quite spectacular to see the school bus drive past my house yesterday. My kids are not in school just yet but there is just something about the first day of school that makes me giddy. Not that I am ready to rush my kids out in to the world but I am truly looking forward to their school days. Ahhh fall.... I digress....

It seems silly to be talking about Autumn in August but the weather will do what the weather will do. As I sifted through my collection of soups and stews I was delighted when I came across my pepperoni pizza soup. It has been a while since I had made this and forgot how I put it together, it has zucchini!!! I created this recipe in 2008 when I had given up wheat and dairy and missed pizza so much. I was determined to find a way to enjoy the flavors even though I would be missing the gooey cheese.

When I make this I like to make spelt bread sticks. Which is just a spelt pizza dough baked in a heavily oiled (EVOO) 13x9 pan topped with more oil and sprinkled with italian seasoning. If you would like a detailed recipe for this leave me a comment and I will put one together.

Even though I specifically created this recipe to be wheat & dairy free there is no reason you can't use traditional pasta and sprinkle parmesan cheese on top.


Chop up all your veggies. I like to chop mine small enough that I get to enjoy all of the flavors in one bite.

Collect the rest of the ingredients. Note that my recipe calls for stock not broth. Broths are just watery in my opinion. I prefer the kitchen basics stocks, I think they have a much richer flavor than other brands. 

In a large pot saute the pepperoni in a small amount of olive oil over medium high heat for about 5 minutes. The olive oil is just to get things going and not to scorch the pepperoni before it starts cooking. Do not over cook the pepperoni. This step is mainly to get as much oil out of the pepperoni as possible. If you think that the pepperoni needs to come out before 5 minutes, do it. 

Remove pepperoni from the pot with a slotted spoon. Pour off all but 1 table of the pepperoni fat. Look at all that fat. My husband was shocked when he saw how much I poured off. Not all pepperoni has the same fat content so you might have less then I did however it is best to do this anyway. Fat + soup = not good.

Be sure to leave behind, or add back, the 1 tablespoon of pepperoni fat to cook the veggies in. A good amount of the flavor comes from this.

Add the onion, green & red bell peppers, zucchini and black pepper to the pot. Over medium high heat saute the vegetables in the pepperoni fat for 5 minutes. 


Add the garlic, crushed red pepper and oregano. Saute for 2 minutes. Do not brown the garlic it can become bitter.  


Add the tomatoes, chicken stock and pasta. Cover and cook for about 8 min or whatever your pasta's cooking time is. 
I had to show you this. It's an Ulu chopping set. My in-laws brought this back for me from a trip they took to Alaska.  I think I was told that it is used for something with fish. I don't care for fish but have found that it works great for chopping herbs. Isn't it nifty?
The blade is super sharp and does a great job chopping the herbs and not bruising them. Of course any cutting board and knife would work for chopping herbs. I find herbs stain and I like having a dedicated board for this. 
Since the pepperoni has a ton of salt and the chicken stock I use has salt I don't add salt to this recipe. After the pasta is done cooking I always taste to see if salt is needed then add salt to taste. 
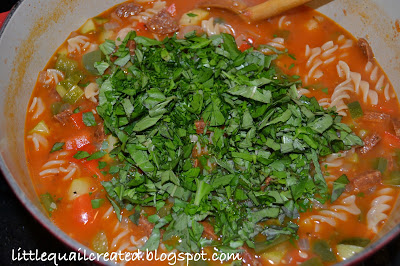
Turn off heat and stir in the the chopped basil and parsley and serve.


Pepperoni Pizza Soup (D/F & W/F)
by Darla Quail

1 tsp of olive oil
1/2 of a large stick of pepperoni, cubed (quartered lengthwise then chopped)
1 large onion, diced
1 green bell pepper, diced
1 red bell pepper, diced
2 small zucchini, diced
1/4 tsp black pepper
1/2 tsp crushed red pepper (optional)
4 garlic cloves, minced
1/2 tsp dried oregano
1 16oz can crushed fire roasted tomatoes
4 c chicken stock (= 32 oz carton)
8 oz dried rice pasta (anything should work, I have even broken up lasagna noodles)
small handful of fresh parsley (I have used 1 tsp dried in a pinch but fresh is always better)
small handful of fresh basil (I have used 1/2 tsp dried in a pinch but fresh is always better)

In a large pot saute the pepperoni in olive oil over medium high heat for about 5 min. Remove pepperoni from the pot with a slotted spoon. Pour off all but 1 table of the pepperoni fat. Add the onion, green & red bell peppers, zucchini and black pepper to the pot. Over medium high heat saute the vegetables in the pepperoni fat for 5 minutes. Add the garlic, crushed red pepper and oregano. Saute for 2 minutes (do not brown the garlic). Add the tomatoes, chicken stock and pasta. Cover and cook for about 8 min or whatever your pasta's cooking time is. Taste to see if salt is needed then add salt to taste. Turn off heat and add the chopped basil, parsley and serve. 

If you are one of the lucky ones who can enjoy dairy this soup is great with parmesan cheese or an italian cheese blend sprinkled on top.  

I really hope you enjoy this soup as much as we do.

Thanks for stopping by the nest!
Darla

Tuesday, August 6, 2013

Zucchini Bread Recipe

I have to say I have created what I would consider the definitive zucchini bread recipe. Sorry for being so immodest, but I really think this is yummy. A few years back during another mountain crop of zucchini I tried at least a dozen or more recipes from all the standard cookbooks and websites none turned out the way I thought this bread should. Sweet but not too sweet, moist with a bit of spice. Out of frustration I took what I knew from making quick breads in the past and came up with this recipe. 

I find zucchini does not freeze very well since it has has a large water content however it does freeze well when it is made in to a bread. Like all baked goods they are best fresh from the oven and freezing does detract from it yumminess but it is still very good. It's better than throwing out a good crop of zucchini when we can not eat all that we harvest. 


Unfortunately, I don't have any pretty finish photo's of the bread. It didn't last long enough to get a pretty photo. Its is all about the taste which I can't show you any way's. Take my word for it and bake up a couple loaves and get a hot cup of coffee. HEAVEN.

I prefer to use the larger zucchini's for baked goods and reserve the smaller ones for meals. The larger one in this picture was the perfect size (3 cups) for this recipe. 
Move the oven racks so the tops of the loaf pans is in the center of the oven. Preheat the oven to 350. Grate the zucchini. I like to use my food processor for this. 
Have a little more fun and get your super-duper helper. My guy is so silly. He is an awesome helper too.   
Mix all your wet ingredients in a large bowl and then your dry in a separate bowel. Grease two loaf pans. After the oven is done preheating add the dry mix to the wet. It is a very thin batter, trust me it will turn out.  Pour into the loaf pans and bake for 50 - 70 minutes. If you have a convection bake I highly recommend using it when baking this bread. Using my convection bake it takes 60 minutes.
When a toothpick comes out clean remove and cool in the pans for 10 min. Remove the loaves from the pans and continue to cool on the racks. Or if you are like me, immediately cut a slice and get a cup of coffee and savor the yumminess.
Zucchini Bread
by Darla Quail
D/F

3 c shredded zucchini
2 1/4 c sugar
1 c canola oil
3 tsp vanilla
4 large eggs
3 c flour (I use white spelt)
2 tsp baking soda
1 tsp salt
3 tsp cinnamon
1/2 tsp nutmeg
1 tsp baking powder
1/2 c chopped walnuts or pecans (optional)

Move oven racks so the tops of the loaf pans are center in the oven. Pre-heat the oven to 350. (If you have it, convection bake works great here.) Grease two loaf pans. Mix the zucchini, sugar, oil, vanilla & eggs in a large bowl. In another bowl mix the flour, baking soda, salt, cinnamon, nutmeg & baking powder. 
Once the oven has finished pre-heating add the dry ingredients to the wet. If you are adding nuts mix them in at this time. Pour in to the loaf pans dividing the batter as even as possible. Bake for 50 - 70 min. 
Remove from the oven when a tooth pick comes out clean. Cool in the pans for 10 minutes. Remove from the pans and continue to cool on a rack. 
If freezing, wrap a completely cooled loaf in plastic wrap then wrap again in foil. Label and store in the freezer for up to 3 months. 

I have not tried this recipe with wheat all purpose flour however I use white spelt as my substitute for wheat all purpose flour for all recipes that call for wheat all purpose flour. White spelt is very close to cake flour which is more tender then all purpose. So you will most likely have good results with wheat all purpose flour it just may not be as soft and tender. 

Spelt has less gluten then wheat all purpose flour however it is not gluten free. I have not tried this with a gluten free flour mix yet but plan to for my next batch. I will update this post when I do. If anyone attempts it before I get to, let me know how it goes by leaving me a comment. 

Thanks for stopping by the nest!
Darla

Monday, August 5, 2013

Sausage Zucchini Skillet Recipe

It's that time of summer. My husband has a load of zucchini coming out of the garden. Time to cook up some of our go-to zucchini recipes. I am not sure if I love or hate growing this vegetable. I really enjoy it for awhile but eventually we become over run with zucchini. I figured this is great opportunity to do a week long zucchini recipe series.  Hopefully this will help me stay on top of our growing mountain of zucchini too.

This recipe is modified recipe I was given at my bridal shower. The original recipe is a stuffed acorn squash that does not have zucchini in it. I was looking for uses for zucchini and figured why not try it as a stuffed zucchini recipe. It was really yummy that way too but then I had kids. In my current stage of life if it is not simple it is just not going to happen. So this recipe was changed again this time just to be a skillet meal. I'd have to say it is just as good just not as pretty. 


We eat wheat free and dairy free in our home so I make substitutions to a lot of my recipes. Some additional explanations can be found here on my blog. If you have special dietary needs always read the labels for any processed foods (this includes condiments).


Chop the veggies and gather the rest of your ingredients. 
In a large skillet over medium high heat with oil brown the sausage. Add the veggies. Cook until meat is cooked through and veggies have softened.
Reduce heat to low and add the sour cream, mustard & cheese. To make this cow's milk free we use pecorino romano cheese made from sheep's milk instead of parmesen cheese. And Tofutti brand sour cream which is made from soy. 
Stir to combine and heat through over low heat for a couple minutes.
Serve over rice. Enjoy!


Sausage Zucchini Skillet
*W/F & *D/F substitutions provided

1 tbsp olive oil
1 lb bulk sausage (we use turkey sausage)
1 medium onion, finely diced
1/2 c diced celery
1/2 c diced carrot
2 small zucchini, diced
1/2 c sour cream (we use tofutti sour cream)
2 tbsp dijon mustard
1/4 c grated pecorino romano cheese (this is a sheep's milk cheese - parmesan can be used as an alternative)

Add oil and sausage to a large skillet. Brake up and brown the sausage over medium high heat. Add the onion, celery, carrot and zucchini. Cook till vegetables are soft and the sausage is cooked through. Reduce heat to low and stir in sour cream, dijon mustard and cheese. Serve over rice.

*W/F = Wheat Free (does not necessarily mean gluten free)
* D/F = Dairy Free (No cow's milk or anything derived from cow's milk)

Come back tomorrow for Zucchini Bread.

Thanks for stopping by the nest!

Darla