Wednesday, July 31, 2013

Criss Cross Pinafore Tutorial

It has been about a week since I blogged and sewn anything for fun. I have been missing it but this past week has been necessary for completing outstanding projects and planning for the future, which I can't wait to share with you. For now, I figured it was about time to get this post out there. Sorry to anyone who was looking for the criss cross pinafore tutorial sooner.


I love this pinafore style. It is so cute in the warmer weather months with bloomers or in the colder months layered with long sleeves and jeans. Plus, it grows with the kids well since the open back expands to fit a wide range of sizes. 


For those who did not follow this year's summer Kid Clothing Week Challenge, I drafted this pattern using the front piece of McCalls 5416 pattern. This tutorial is to show you how to use that pattern (or another one you may have in your stash that is similar) to draft a criss cross back. 

What you will need:
McCall's Pattern 5416 (or any other similar A-Line shape top pattern)
tracing paper (I use freezer paper)
pencil, eraser & scissors
french curve (you can also wing it if you are comfortable)
1 yard of main fabric
1 yard of lining fabric (make sure this is pretty if you want it to be reversible)
4 buttons for reversible or 2 buttons and 2 sew on snaps for a no reverse faux button snap top (which is what is used for this tutorial)
all the typical sewing notions


With a low temp dry iron lightly iron the manufacture's tissue paper pattern. Trace the front & back pattern pieces (pieces #1 & #4, top length) for the size needed including the button hole markings. 

(You may have noticed I included all of the markings from the pattern on the tracings. All of these will not be needed for this project but I know I am likely to make this top again so I went ahead and did it now to save myself the effort in the future.)

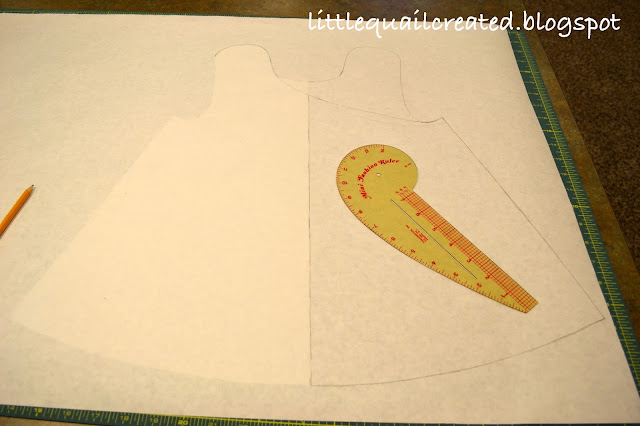
Cut out the back pattern piece (#4). Trace the back piece again on another piece of paper that is large enough to accommodate the top back in its entirety. Then I slid the original tracing under the newly traced pattern so that the tracings meet to form the complete back, like shown above.


If you have a french curve it will come in very handy here. (don't you love my 60's vintage one? It was my mother's.) Create a curve from the new tracings arm pit to the shadows shoulder strap, like shown above. You can make the curve as deep as you would like just make sure that it connects to the arm pit and the strap like shown. Complete the tracing of the shadow's shoulder strap.


Repeat, by making another curve from the outside of the shoulder strap to the shirt bottom like shown above. The section between the curves and from strap to the side is the criss cross pattern piece. The you can erase the unecessary markings if you wish. Cut out the pattern piece. Mark the button hole placement on the strap.

This shows how the front piece matches up with your newly drafted criss cross piece.

We are using the manufacture's 5/8" seam allowance guideline for all the seams. The original pattern has a 1 1/4" hem at the bottom however the criss cross pinafore does not have a hem since it is reversible or fully lined. Therefore we need to remove the excess length. Match up front and back pieces and draw a line 5/8" across the bottom following the curve and taper off as shown above. Cut off this 5/8" excess. 

PATTERN DONE! WOOHOO!

Cut out the front pattern piece on the fold. 1 on the main fabric and 1 on the lining.
Cut out the back criss cross pieces.  2 on main fabric (mirror image) and 2 on the lining (mirror image).


Take the main fabric pieces and match the front side seams to the two back criss cross pieces side seams fabric fronts facing each other. Pin and sew with a 5/8" seam allowance. Repeat with the lining pieces. 


Lay the main fabric piece on the lining piece, fronts facing each other. Match up the edges of the pieces best you can. Make sure there is no bumps or bubble. Pin all the way around the outline. leave an opening at the bottom. Approximately 3". Sew a 5/8" seam allowance all the way around except the opening. 


Cut notches on all of the curves. Since the thing is pretty much all curves I just used pinking shears all the way around.


Turn right side out. Make sure you take the time to check the seam all the way around. Press the seam flat. Fold in the seam allowance for the opening to be even with the rest of the pinafore. Press and pin closed. If you would like you can take the time to hand stitch the opening closed but I skip that part since I know the seam will be closed during top stitching.


Top stitch 1/8" in all the way around. 


Mark the button hole and button placement. If you would like traditional button holes now would be the time to do it. For reversible you will need to sew buttons on the front and the back of the front straps. Continue on if you would like to do hidden snaps. 


There are all sorts of snaps out there, I chose to use sew-on snaps since this is what I had on hand and they work well when wanting to add a faux button closure.  


Line up the snaps over the markings (centering over where the button hole would be) and stitch in place. I find it easier to sew the snaps on first then adding the button. Since the button hides the stitching of the snap I didn't take much care to only stitch through one layer of fabric. In hind-sight I think it would be best to add some sheer weight interfacing to the straps for extra stability. Next time. 


I hope you found this useful. Leave me any comments if you run in to any trouble. Feed back is always welcome.

Thanks for stopping by the nest!
Darla


Monday, July 22, 2013

KCWC - Day 6 - Reversible Criss Cross Pinafore

My weekend got away from me. I only managed to complete one item instead of the two I was hoping for. I am a little bummed but it was for good reason. I had some projects for other people that needed to take priority. I will get to last KCW item later this week.


I have been wanting to make a criss cross pinafore for sometime now. I made the one by smashed peas & carrots back in April but found it to be too big for Hannah to wear right now therefore I never did a post for it. I am sure she will get a lot of use of that one next summer. This left me with the idea of drafting my own. I had seen some suggestions on how to do it and though I would give it a whirl. 


I cheated a little and used the front of MaCall's 5416 pattern that I had success with in the past here. I then drafted my own criss cross back to match it.  I was really easy to do and came together quickly. I would imagine that any a-line style top pattern would work. Drafting the front pattern too would probably be simple too. Here is a great tutorial for drafting the whole pattern. I did the hidden snap buttons again since they worked out so great here.


I know the colors seem odd for summer time. To be honest I really made this for Hannah's fall wardrobe and intended it to be layered with long sleeves and jeans. I thinking that is going to look adorable. For now I just paired it with a cream linen bloomers. Dana from MADE has an awesome free pattern and tutorial for bloomers.


My version turned out to be a bit large too. Sigh.... oh well. The longer she gets to wear it for.


I love the sweet little bottom and cub roll thighs! 


My next post is going to be a tutorial on how I drafted this using the McCall's front pattern. Maybe others who already own this or a similar pattern will find it useful.

Thanks for stopping by the nest!
Darla

Saturday, July 20, 2013

KCWC - Day 5 - Summer Flutter Top

Day 5 took a little long than expected. I managed to get everything done on time but this post. Well here it is....


I bought this pattern back in the spring on a whim. I love the square neckline with the full gathered body. It is the Summer Set Flutter Top/Dress and Bloomers pattern by Aesthetic Nest. I only did the top for this pattern. I'll get to the bloomers another time. The top is not very impressive from the front on a hanger.


But isn't the back darling? (just wait till you see it on her below) I really love the buttons. They're nothing special, basic cheap plastic but the blue pops. If you couldn't tell by now I kinda have a thing for blue, especially on Hannah. 


I had been hanging on to this fabric waiting for the perfect application for it. I have to say this is perfect. 


The back is completely open and just held together at the top with the buttons. Well actually they are snaps. I had mentioned in a prior post that I love big buttons but hate the big button hole that ends up peaking out. My solution is to install hidden snaps behind where the button is to be seen. As I show below in the photos.  
It takes a little longer to sew in the snaps but it is worth it in my opinion. I usually have to pin my kids down to dress them and it is so much easier with snaps rather then buttons. 


I don't have time to do a proper pattern review right now but I plan on doing one in the future when I make the dress version in velvet this fall.

Thanks for stopping by the nest!
Darla


Friday, July 19, 2013

KCWC - Day 4 - Comfy Knit Dress

This week must seem very redundant. I have used the same fabric and patterns over and over again. I am sorry for that. This summer has been particularly busy for me therefore I am sticking with familiar things for now. I do promise some different stuff this weekend. 


Aren't you proud of me I am using a different fabric than I did the past three day's, whoo hoo! I have made the comfy knit dress by LBG Studios before here. When I made this dress the first time I followed the instructions for a 2 tier dress which does not have pockets. This time I did the 1 tier with pockets. Neither version is overly challenging and take about the same amount of time to do. 


So technically this is different fabric then I have used before. It is the same maker and poka-dot as the 2 tier version I made during spring KCW however it is blue and not pink. What can I say, I am not much of a risk taker. Oh geez, I used the same buttons too! sigh... 


I did stretch myself a little bit. This was the first time I have made pockets in the side seam. I also deviated a little from the pattern instructions and followed this method for hemming knits instead which I found through pinterest on the Sweet 'n' Sassy Girls blog.  


This is the first time I have done this kind of hem and I have to say this method is awesome! I can't see hemming knits any other way now. 


My husband and I agree that this version is not as cute or twirly as the 2 tier but I don't think you can ever have enough knit for kids (or grown-up). I know this dress will get lot of use. I am thinking this would be good with a long sleeve underneath for the colder months.

If you are a sewer and have 2t/3t kid to sew for this pattern is a must. It is available free in the one size on the LBG Studio's website. I think this is a good first time knit project since it only has the one hem (which is the tricky part with knits). So don't let the fabric type hold you back.

Thanks for stopping by the nest!
Darla

Thursday, July 18, 2013

KCWC - Day 3 - Shorts


Day 3 went really smooth. It helps that I used the Gathered Pocket Shorts that I have made several times and the Riley Blake fabric that I have sewn my last couple projects with. I have to say I really love both. The fabric, of course, is about the best you can get (without braking the bank) and the shorts pattern I drafted has worked out very well. 


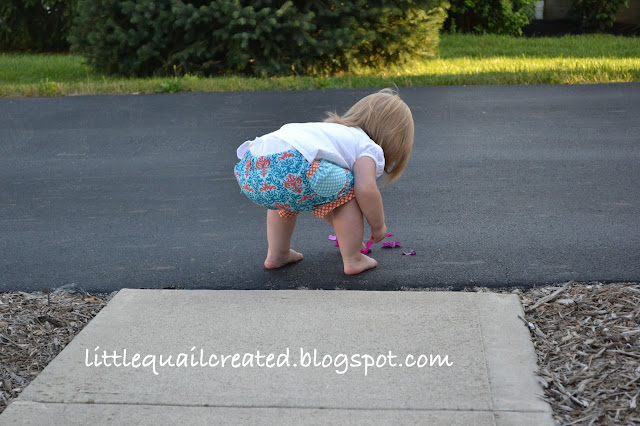
When I drafted the Gathered Pocket Shorts pattern I specifically wanted shorts that had better coverage on Hannah's bottom. I was getting very annoyed with shorts that I would slid down the minute she bent down or squatted. As you can see in the photo above my pattern solved that problem.


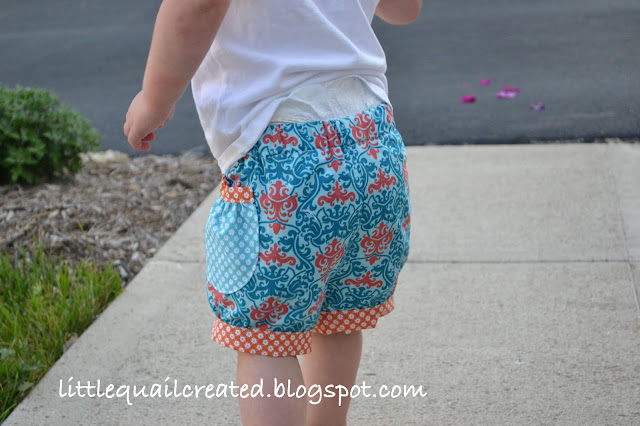
When she stands up after squatting they still sit just right on her waist. 


I love the detail of the pockets although I don't know how functional they are. Hannah has not yet discovered the fun of pockets. 

The pattern is currently only in a size 2T. I am considering making this pattern in more sizes. Leave me a comment to let me know if this is something you would like me to do.

Thanks for stopping by the nest!
Darla